Submit an experiment with A8 nodes and the web portal
![]() Difficulty: Easy
Difficulty: Easy
![]() Duration: 15 minutes
Duration: 15 minutes
Prerequisites: Configure SSH Access
Description: The aim of this first tutorial is to discover the IoT-LAB testbed tools by creating and submitting your first experiment, and then interact with running nodes. You will book two A8 nodes on the Grenoble site and deploy it on them. Once deployed, you will hop onto the ssh frontend, ssh connect to them, set up their M3 node with a sample firmware file, and interact with the firmware running on the A8-M3 node and send radio packets.
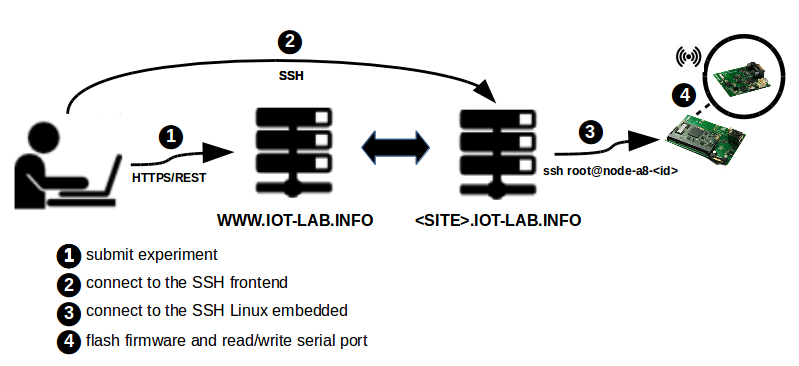
- Log into the Webportal
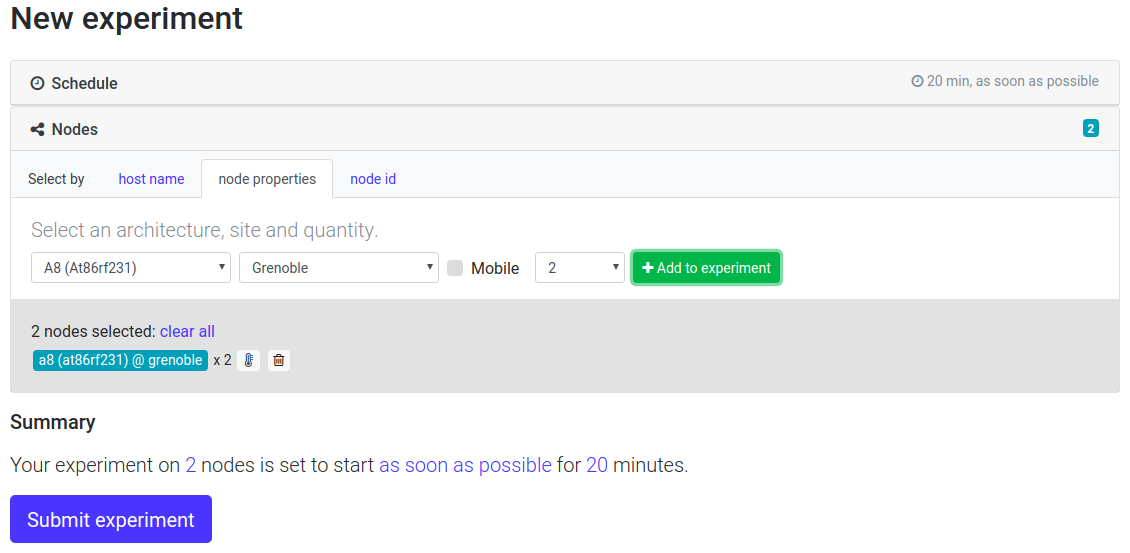
- Launch a new experiment
- Schedule: set an experiment name (no spaces nor funny chars in the experiment name)
- Nodes: Add to experiment (with node properties tab) two nodes with A8 (At86rf231) archi on the Grenoble site
- Submit experiment

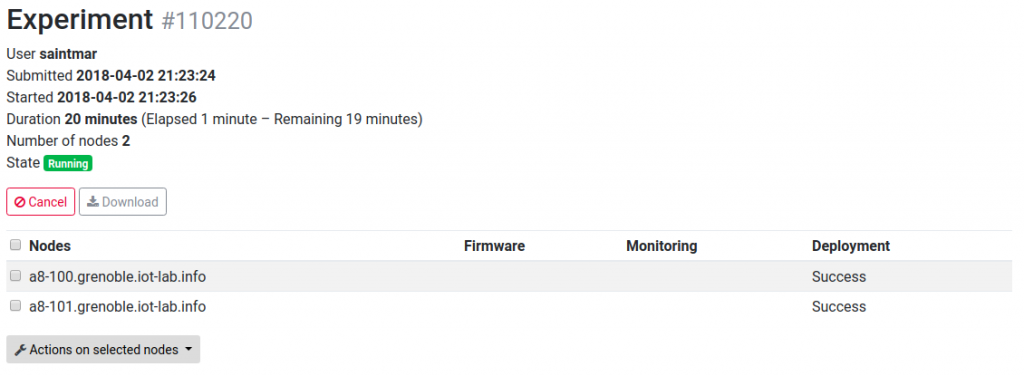
- Wait experiment state Running in the Schedule dashboard section. After click on experiment details and visualize which nodes you are booked and verify that you have Success in the deployment result
- Connect to the SSH frontend site
my_computer$ ssh <login>@grenoble.iot-lab.info
- Download the M3 firmware that we use in this tutorial to send radio packets between two A8 nodes through their M3 radio subsystem. This firmware must be placed in the A8 directory of your home directory (
~/A8/)on the IoT-LAB frontend, this directory is automatically accessible from all the A8 nodes of your experiment.<login>@grenoble:~$ cd A8 <login>@grenoble:~/A8$ wget https://raw.githubusercontent.com/wiki/iot-lab/iot-lab/firmwares/tutorial_a8_m3.elf -O tutorial_a8_m3.elf --2015-10-19 19:08:20-- https://raw.githubusercontent.com/wiki/iot-lab/iot-lab/firmwares/tutorial_a8_m3.elf Resolving raw.githubusercontent.com... 185.31.17.133 Connecting to raw.githubusercontent.com|185.31.17.133|:443... connected. WARNING: certificate common name “www.github.com” doesn’t match requested host name “raw.githubusercontent.com”. HTTP request sent, awaiting response... 200 OK Length: 139259 (136K) [application/octet-stream] Saving to: “tutorial_a8_m3.elf” 100%[=====================================================================================================================================================================================================>] 139,259 --.-K/s in 0.09s 2015-10-19 19:08:21 (1.48 MB/s) - “tutorial_a8_m3.elf” saved [139259/139259]
- Note: When your experiment is Started, A8 nodes still needs some time to boot, it may take from 1 to 10 minutes depending on the platform activity. So be patient. Nodes can also fail to boot…
<login>@grenoble:~$ ssh root@node-a8-100.grenoble.iot-lab.info
ssh: connect to host node-a8-100.grenoble.iot-lab.info port 22: No route to host
<login>@grenoble:~$ ssh root@node-a8-101.grenoble.iot-lab.info
ssh: connect to host node-a8-101.grenoble.iot-lab.info port 22: Connection refused
- SSH connect as root to one of your A8 boards, the url is ‘
node-a8-<num>.site.iot-lab.info‘<login>@grenoble:~$ ssh root@node-a8-100.grenoble.iot-lab.info The authenticity of host 'node-a8-100.grenoble.iot-lab.info (10.0.20.100)' can't be established. RSA key fingerprint is 2b:a9:fc:bc:d5:77:27:24:06:fc:46:a2:87:17:e9:b0. Are you sure you want to continue connecting (yes/no)? yes Warning: Permanently added 'node-a8-9.grenoble.iot-lab.info,10.0.20.100' (RSA) to the list of known hosts. Last login: Tue Oct 21 14:25:11 2014 from 10.0.15.251) root@node-a8-100:~#
- You can check that the firmware is indeed present in the A8 folder.
root@node-a8-100:~# ls A8
tutorial_a8_m3.elf
- A8 nodes are running a minimal embedded linux system, most unix commands and python language are supported. You can test the ethernet connectivity between from your two nodes.
root@node-a8-100:~# ping node-a8-101
PING node-a8-101 (10.0.20.101): 56 data bytes
64 bytes from 10.0.20.101: seq=0 ttl=64 time=5.616 ms
64 bytes from 10.0.12.101: seq=1 ttl=64 time=1.038 ms
64 bytes from 10.0.12.101: seq=2 ttl=64 time=0.977 ms
- In this tutorial, we will use the M3 subsystem of the A8 in order to use their 802.15.4 connectivity. When your experiment starts, the M3 subsystem of your A8 node doesn’t run any firmware, so we need to flash them with a basic provided firmware.
root@node-a8-100:~# flash_a8_m3 A8/tutorial_a8_m3.elf
Open On-Chip Debugger 0.7.0 (2014-10-16-11:55)
Licensed under GNU GPL v2
For bug reports, read
    http://openocd.sourceforge.net/doc/doxygen/bugs.html
adapter speed: 1000 kHz
Info : only one transport option; autoselect 'jtag'
DEPRECATED! use 'adapter_nsrst_delay' not 'jtag_nsrst_delay'
adapter_nsrst_delay: 100
jtag_ntrst_delay: 100
trst_and_srst separate srst_gates_jtag trst_push_pull srst_open_drain connect_deassert_srst
adapter speed: 1000 kHz
adapter_nsrst_delay: 100
jtag_ntrst_delay: 100
cortex_m3 reset_config sysresetreq
Info : max TCK change to: 30000 kHz
Info : clock speed 1000 kHz
Info : JTAG tap: stm32f1x.cpu tap/device found: 0x3ba00477 (mfg: 0x23b, part: 0xba00, ver: 0x3)
Info : JTAG tap: stm32f1x.bs tap/device found: 0x06414041 (mfg: 0x020, part: 0x6414, ver: 0x0)
Warn : Block read error address 0xe000ed00
Error: stm32f1x.cpu -- clearing lockup after double fault
Error: JTAG-DP OVERRUN - check clock, memaccess, or reduce jtag speed
Error: MEM_AP_CSW 0x23000042, MEM_AP_TAR 0xe000edf0
Polling target stm32f1x.cpu failed, GDB will be halted. Polling again in 100ms
Error: JTAG-DP OVERRUN - check clock, memaccess, or reduce jtag speed
Error: MEM_AP_CSW 0x23000042, MEM_AP_TAR 0xe000edf0
Polling target stm32f1x.cpu failed, GDB will be halted. Polling again in 300ms
    TargetName         Type       Endian TapName            State
--  ------------------ ---------- ------ ------------------ ------------
 0* stm32f1x.cpu       cortex_m   little stm32f1x.cpu       unknown
Info : JTAG tap: stm32f1x.cpu tap/device found: 0x3ba00477 (mfg: 0x23b, part: 0xba00, ver: 0x3)
Info : JTAG tap: stm32f1x.bs tap/device found: 0x06414041 (mfg: 0x020, part: 0x6414, ver: 0x0)
target state: halted
target halted due to debug-request, current mode: Thread
xPSR: 0x01000000 pc: 0x08002784 msp: 0x20010000
Polling target stm32f1x.cpu succeeded again
Info : JTAG tap: stm32f1x.cpu tap/device found: 0x3ba00477 (mfg: 0x23b, part: 0xba00, ver: 0x3)
Info : JTAG tap: stm32f1x.bs tap/device found: 0x06414041 (mfg: 0x020, part: 0x6414, ver: 0x0)
target state: halted
target halted due to debug-request, current mode: Thread
xPSR: 0x01000000 pc: 0x08002784 msp: 0x20010000
auto erase enabled
Info : device id = 0x10016414
Info : flash size = 512kbytes
wrote 28672 bytes from file A8/tutorial_a8_m3.elf in 1.634979s (17.126 KiB/s)
verified 28512 bytes in 0.740173s (37.618 KiB/s)
Info : JTAG tap: stm32f1x.cpu tap/device found: 0x3ba00477 (mfg: 0x23b, part: 0xba00, ver: 0x3)
Info : JTAG tap: stm32f1x.bs tap/device found: 0x06414041 (mfg: 0x020, part: 0x6414, ver: 0x0)
shutdown command invoked
Return Value: 0
root@node-a8-100:~#
- Each A8 communicates with its M3 subsystem through a serial link named /dev/ttyA8_M3 (speed 500 kB/s). The firmware we flashed on the M3 in the previous step is interactive : it waits for a character on its serial line and sends a packet. One way of interacting with the M3 from the A8 is to use the miniterm.py tool
root@node-a8-100:~/A8# miniterm.py --echo /dev/ttyA8_M3 500000
--- Miniterm on /dev/ttyA8_M3: 500000,8,N,1. ---
--- Quit: Ctrl+]
IoT-LAB Simple Demo program
Type command
    h:    print this help
    u:    print node uid
    d:    read current date using control_node
    s:    send a radio packet
    b:    send a big radio packet
    e:    toggle leds blinking

 Type Enter to stop printing this help
cmd >

IoT-LAB Simple Demo program
Type command
    h:    print this help
    u:    print node uid
    d:    read current date using control_node
    s:    send a radio packet
    b:    send a big radio packet
    e:    toggle leds blinking

cmd >
- Now, connect, flash and start miniterm for the other A8 node.
my_computer$ ssh <login>@grenoble.iot-lab.info
<login>@grenoble:~$ ssh root@node-a8-101.grenoble.iot-lab.info
root@node-a8-101:~# flash_a8_m3 A8/tutorial_a8_m3.elf
root@node-a8-101:~/A8# miniterm.py --echo /dev/ttyA8_M3 500000
--- Miniterm on /dev/ttyA8_M3: 500000,8,N,1. ---
--- Quit: Ctrl+]
IoT-LAB Simple Demo program
Type command
    h:    print this help
    u:    print node uid
    d:    read current date using control_node
    s:    send a radio packet
    b:    send a big radio packet
    e:    toggle leds blinking
Type Enter to stop printing this help cmd >
- Now we will make the two nodes communicate using the radio
- On the first terminal, Type ‘s’ and ‘b’ to send packets to your other node
cmd > s
radio > Packet sent
cmd> b
radio > Big packet sent
- On the second node you should see the received message
cmd >
radio > Got packet from 3185 (a8-100). Len: 16 Rssi: -49: 'Hello World!: 1'

cmd >
radio > Got packet from 3185 (a8-100). Len: 60 Rssi: -49: 'Big Hello World!: 1 012345678901234567890123456789012345678'
- On the first terminal, Type ‘s’ and ‘b’ to send packets to your other node

Congratulations, you completed the first A8 nodes tutorial !
Go further
The testbed provides A8 command-line tool (eg. iotlab-ssh) which automatizes all the operations executed in this tutorial like waiting for boot, flashing a firmware on the M3 subsystem, running a command or a script and so on. It was provided by default on each IoT-LAB frontend or you can directly install it on your computer to remotely interact with A8 nodes.
- SSH CLI Client tutorial