Contents
Configure your SSH access
![]() Difficulty: Medium
Difficulty: Medium
![]() Duration: 10 minutes
Duration: 10 minutes
Description: The goal of this tutorial is to setup your ssh access to the IoT-LAB servers. You will create an ssh key pair for authentication, register the public key on the website, and test your access to a testbed server.
Create an ssh key pair
The ssh key pair creation is different on Unix systems or Windows so please follow the proper section.
Unix
The SSH key generation is fairly straightforward on Unix systems. Just type the following command in a terminal:
you@yourpc:~$ ssh-keygen -t rsa
Generating public/private rsa key pair.
Enter file in which to save the key (/home/you/.ssh/id_rsa):
Created directory '/home/you/.ssh'.
Enter passphrase (empty for no passphrase):
Enter same passphrase again:
Your identification has been saved in /home/you/.ssh/id_rsa.
Your public key has been saved in /home/you/.ssh/id_rsa.pub.
The key fingerprint is:
14:13:be:59:3c:ab:fa:df:78:8e:39:fc:72:9c:9e:7d you@yourpc
The key's randomart image is:
+--[ RSA 2048]----+
|        +.       |
|       . +       |
|        o +      |
|       . + o     |
|        S .      |
|         .       |
|        .. . .   |
|       .  +==o  E|
|      ....=O* .. |
+-----------------+

you@yourpc:~$ ls ~/.ssh/
id_rsa  id_rsa.pub

you@yourpc:~$ cat ~/.ssh/id_rsa.pub
ssh-rsa AAAAB3NzaC1yc2EAAAADAQABAAABAQCvO5swUgdzu/cLDf44R90OUrd32lScJtnI+hujpRh9WwZnYiFE/0M+DymrMzYe2UF65pA4T0rai5tUnnQ4K5a1rwM1qeXoe/JZPPZ+U3sn5KDh2iMlVwAUT00jubAi8mYjHC1eT1ZqpprrM0hsoj7BavXRjut737W9kp4cwt7zA6wGB3zemv7fLUJnriOA1DrAYis9kWqJLvEca0hW1Hbd0e9rvUajwoKAQPJrSSK+GFEaKZ/kbWCumUy4BXStGhrNt/+OABT1d9WXtfUi/AeKkYXZWjy/PO1hvtooeWw1VYT0htiKkAox9UellVxpK/ARmQYjlNyVIL/D9HlYMjCd you@yourpc
Two files will be created at the destination folder (by default ~/.ssh/):
- The public key has the .pub extension. This is the key that you will copy on the webportal.
- The private key should never be sent to anyone, even us, and remain secret.
You can get more info about the ssh-keygen command in the manpage (which can be found there (fr) for instance).
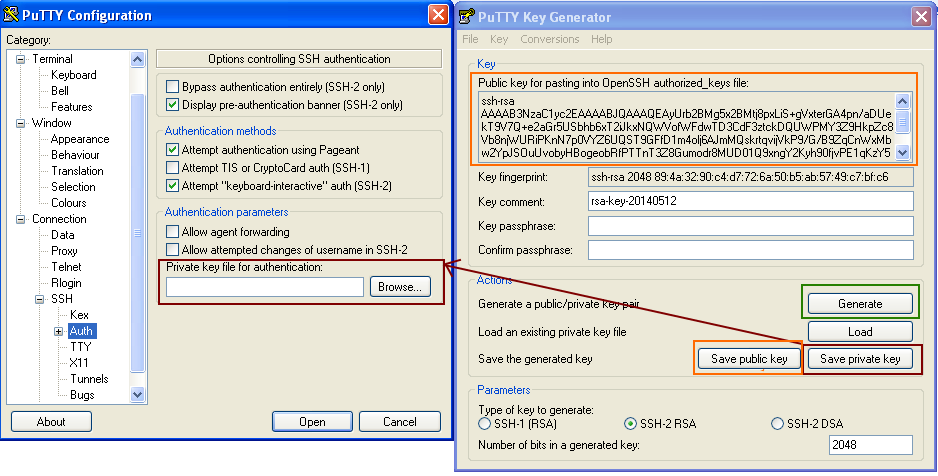
Windows
The SSH key generation can be a little bit more difficult on MS Windows. You need to use Puttygen to generate keys and Putty for the ssh connection.
Register your public key in your IoT-LAB profile
Now that you created your ssh key pair, you can register the public key in your IoT-LAB profile.
- Log into the Webportal and click on the Account icon. Then choose the SSH Keys tab.
- Then paste the public key in the text input and save it by clicking on ‘Update SSH Keys’ button.
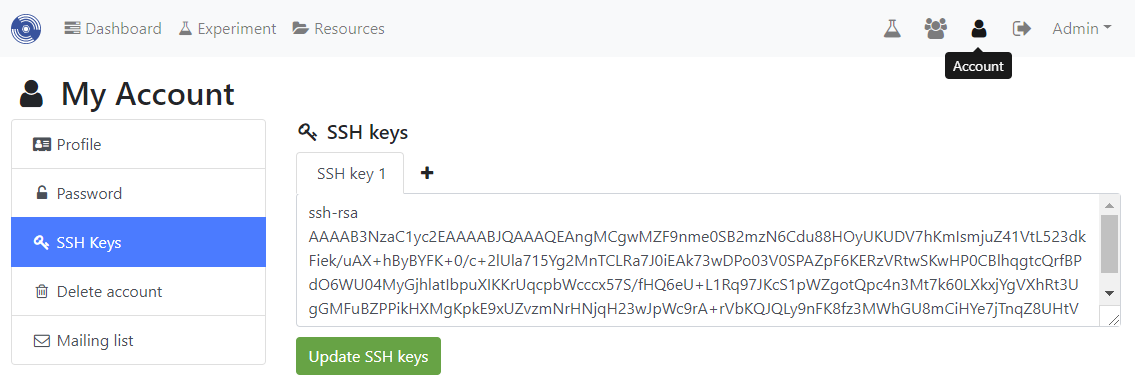
Note: make sure the ssh key you copy ends-up as a single line of text in the text input; if it is broken into several lines, login will not work.
And that’s it ! Your key is registered.
Testing the connection to the IoT-LAB SSH servers
Try to connect to Grenoble site frontend SSH.
you@yourpc:~$ ssh <login>@grenoble.iot-lab.info # replace <login> by your iot-lab login
The authenticity of host 'grenoble.iot-lab.info (194.199.16.167)' can't be established.
RSA key fingerprint is 49:19:e5:fc:a2:be:fe:75:b2:11:33:29:d8:5e:fb:28.
Are you sure you want to continue connecting (yes/no)? yes
Warning: Permanently added 'grenoble.iot-lab.info,194.199.16.167' (RSA) to the list of known hosts.
Linux grenoble 2.6.32-5-amd64 #1 SMP Wed Apr 9 19:24:34 UTC 2014 x86_64
Welcome FIT IoT-LAB users

Charter:
* FIT IoT-LAB is shared among several users, so do a reasonable use of the platform
* Quote FIT IoT-LAB in your scientific papers

Post your issues on:
* the user mailing-list: users@iot-lab.info
* or the bug-tracker: https://github.com/iot-lab/iot-lab/issues

Last login: Thu May 15 14:20:48 2014 from dhcp6.inrialpes.fr
<login>@grenoble:~$
Troubleshooting
If you have the Permission denied (publickey). error, check if you correctly pasted your public key on the IoT-LAB web interface (should be a single line of text) and retry connecting. Alternatively, restart the tutorial from the beginning.